Monday, March 24, 2014

Chapter 5 Overview


During this chapter you will complete the following:


  1. Chapter 5 WS packet.  Please turn it in to the "turn-it-in tray" in class.
  2. Retouching Acne using Paint.NET (Turn it in to the Weebly site when done)
  3. Take 30-50 Environmental Portraits.  Make sure your model signs a "Model Release Form"
  4. Post a contact sheet for Environmental Portraits to your blog.  
  5. Edit and then post your 3-5 best photos from the Environmental Portraits.
  6. Out of Bounds Editing Assignment.  You will create at least 3 of these.  One must be made up of only your own photos.  Post them to your blog.
  7. You will also complete a Midterm Study Guide and take a Midterm Test.  There will not be a test on Chapter 5, but some vocabulary from Chapter 5 will show up on your Midterm Test.

Out of Bounds

For this assignment, you will create 3 different Out of Bounds images.  For at least one image, you MUST use your own photo.   For the other 2, you may use your own photos and/or photos obtained from www.sxc.hu

You will create at least 3 Out of Bounds images....if you create more than 3, I will might give you extra credit!

Here are some examples:

Schutzhund I love my Xterra!
slightly scarey shiney guy

Now, click this link to view some really awesome examples


To find out how to create these images, you need to look at one or more of the following tutorials:

Tutorial 1 (using Paint.NET(be sure to click the tabs at the top that say Gradient and Mask, and Shadow to complete all 3 pages of steps!)
Tutorial 2 (train using GIMP) (plane using GIMP)
Tutorial 3 (car using PhotoShop)

Bonus Points: Make one of your OOBs use Selective Color

Be creative, don't copy!

Environmental Portraits


You will take 30-50 ENVIRONMENTAL PORTRAIT images of a person. (They must sign a model release form. If they are under 18, their parents must sign)

Check out this YouTube video of environmental portraits.

Photos are due Monday.  You will need to post a contact sheet to your blog that contains 30-50 images on Monday.


Thursday, March 20, 2014

Retouching Photo Practice

Links to the YouTube Videos: I Like This One!
Others: Remove Acne using Paint.NET   Acne Tutorial  Remove Acne Using GIMP


Click on this image, copy it and paste it into Paint.NET (or GIMP, if your little heart desires)
Follow the tutorial and edit out the blemishes.  Save it as YourLastNameACNE.jpg and go to www.crouchphotoart.weebly.com to TURN IT IN.  The assignment name is RETOUCH.

Feel free to post before and after photos on your blog, if you want. I won't be grading them from there.

Here's my "after" photo:


Wednesday, March 12, 2014

Composite (choose 3) Assignment Instructions


Composite Assignment:  Choose 3 out of 9

Part 1: You will select 3 of the following list of 9 assignments to complete and post to your blog.  (Make sure you label it with the title when you post it to your blog)  NO GOOGLE IMAGES!  You may use your own photos along with www.pixabay.com,  www.sxc.hu,  and/or www.loc.gov

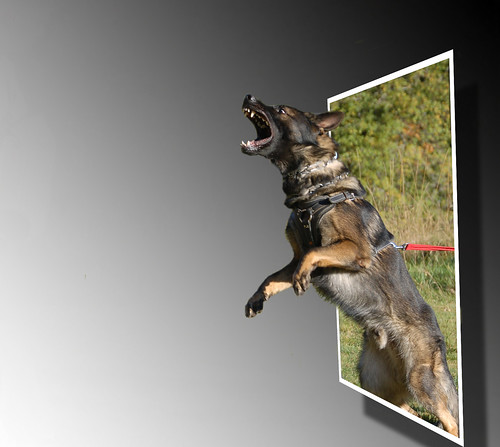
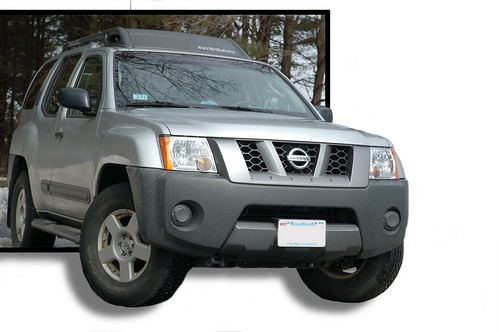
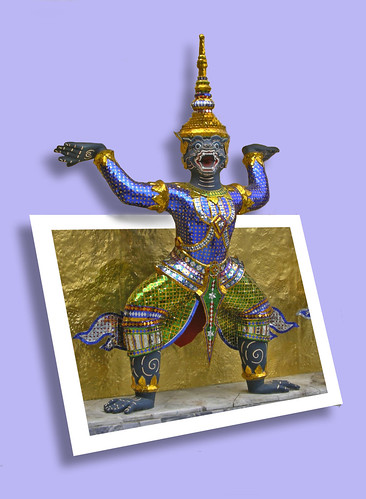
The final images should look realistic and be well thought out.  You cannot throw them together and think you are going to get a good grade!  If the edges aren't cut out well and/or your photos look very unrealistic, your grade will suffer.  Take your time.  Use large images.  Zoom in when cutting things out, etc.  Craftsmanship counts!


1. Where am I? - Take a picture of a friend or have someone take a photo of you (Or use one of your selfies!). Then, take another picture of a place that you would not expect to see that person/youself.  Put yourself or your friend in that surprising place.

2. Untruthful Tabloid-type Photograph - Take a picture and add something to the picture that wasn't there. (Think about stuff found in tabloids i.e. Batboy or UFOs) It must be realistic looking....in a very unbelievable way!

3. Repetition - Take something from a picture and repeat it to create a new picture.

4. Many Me - Take many images of yourself or a friend doing different things in the same room. Create a composite photos that combines at least 3 "many me's" into one room/image/location.

5. Surrealism - An art movement started in Paris around 1924 based onideas of expressing the unconscious. An aspect of this movement wasto combine objects that had nothing to do with one another into onei mage. Create an image which combines two things that would not ordinarily go together.

6. Who's in school? - Take a picture of a school corridor or classroom and put someone or something unexpected in the school. Be sure to download a very large size image.

7. Digital Darwin - Create a new animal by combining at least 2 animals into one new creature. Be sure you select a very large image (from http://www.sxc.hu/ ) for your animals, or take your own photos. Be sure to place your new creature in a habitat where it would live. Here is a link to one that I made.  Remember that furry objects are hard to cut out.  Look for simple backgrounds if you plan on cutting out the animal.

8. A Monument in the Landscape - Enlarge a normally tiny object in a picture so that it is now huge. Use high quality photos..  (Ex: a push pin becomes as large as a building, etc.)

9. Yeah, that's me! - Put your head on another persons body in a funny and creative way. Be sure photos that you use are high quality, large photos. NO GOOGLE IMAGES.

"Choose 3" Examples


1. Where am I? -   Zebra Lunch

2. Tabloid Photograph - Bullrider  Erin Mantis Love

3. Repetition - 

4. Many Me -  Many Me 1

5. Who's in school? -  Example 1 Example 2

7. A Monument in the Landscape - Example 1


Tuesday, March 11, 2014

Motion Blur Photos (due Monday!)

First, check out these links to see some images http://www.digital-photography-school.com/blur-movement
  1. http://www.digitalpicturezone.com/digital-pictures/25-awesome-and-creative-motion-blur-pictures/
  2. http://www.smashingmagazine.com/2008/08/24/45-beautiful-motion-blur-photos/


  3. For this type of image, you'll need to steady your camera on something and release the shutter by setting your timer.  Be creative but to create an image like the one above, you want your subject (here, the man leaning on the pole) to be very still, and something behind them will be moving fast.  Again, use a slow shutter speed (1/8, 1/4, or 1/2) Point and Shoot camera users can use night portrait, night, firewords, landscape, or maybe sunset.
Click this link AND READ IT!!!!!! (really, I mean it will only take you 5 minutes.)  So, puh-leeese, just READ IT

4. http://www.digital-photo-secrets.com/tip/146/how-to-take-photos-with-motion-blur-to-give-the-illusion-of-movement/

5. Almost done! Click the link for an interactive explanation of how blur works with shutter speed.
http://www.photocourse.com/1text/shutterspeed/

6. Finally, http://www.kamerasimulator.se/eng/?page_id=2


Monday, March 10, 2014

Shutter Speed

If Aperture is like your pupil, adjusting the amount of light let in your eye...
then SHUTTER SPEED is (sort of) like your EYELID!  It controls how long your eye is open.

What is Shutter Speed?

Shutter speed, also known as “exposure time”, stands for the length of time a camera shutter is open to expose light into the camera sensor. If the shutter speed is fast, it can help to freeze action completely, as seen in the above photo of the dolphin. If the shutter speed is slow, it can create an effect called “motion blur”, where moving objects appear blurred along the direction of the motion. This effect is used quite a bit in advertisements of cars and motorbikes, where a sense of speed and motion is communicated to the viewer by intentionally blurring the moving wheels.

How shutter speed is measured

Shutter speeds are typically measured in fractions of a second, when they are under a second. For example 1/4 means a quarter of a second, while 1/250 means one two-hundred-and-fiftieth of a second or four milliseconds. Most modern DSLRs can handle shutter speeds of up to 1/4000th of a second, while some can handle much higher speeds of 1/8000th of a second and faster. The longest shutter speed on most DSLRs is typically 30 seconds (without using external remote triggers).

Fast, slow and long shutter speeds

Fast shutter speed is typically whatever it takes to freeze action. It depends on the light, but it is typically above 1/500th of a second for general photography and above 1/1000th of a second for extremely fast moving objects (like bird photography).

Slow shutter speed is considered to be the slowest shutter speed that you can handle without introducing camera shake. Long shutter speeds are typically above 1 second, when you have to use a tripod to get acceptably sharp images (for low-light/night photography or to capture movement).


How to set shutter speed (if you have a DSLR camera)

Most cameras handle shutter speeds automatically through in-camera metering. When the camera is set to “Auto” mode, both shutter speed and aperture are automatically selected by the camera.

There are two ways to manually set the shutter speed:
a) By setting the camera to “Shutter Priority” mode, where you set the shutter speed and the camera automatically selects the aperture based on your lighting situation. This is S or Tv.  
b) By setting the camera to “Manual” mode, where you set both shutter speed and aperture manually.  This takes more practice and you HAVE to look at your light meter, but it allows you more control.
c.)  By setting the camera to "Bulb" or B mode.   This mode allows the user to hold in the shutter-release button  in and the shutter will remain open the entire time while the button is being held.  Not all cameras have a Bulb mode. You MUST use a tripod (or other stabilization device)


How to "set" shutter speed on a Point and Shoot


Most cameras handle shutter speeds automatically through in-camera metering. When the camera is set to “Auto” mode, both shutter speed and aperture are automatically selected by the camera. 
However, we can "trick" the camera into providing us with a short or a long shutter speed.  

Long Shutter Speed (to blur motion)

 Most digital cameras have at least one setting that will provide a long shutter speed.   You may want to try setting your camera to "Landscape" mode (Mountain Icon).  You should turn off the flash.  This might make moving objects look blurry in medium to dim light locations.  It will be trial and error, so be prepared to take a lot of photos and check them to see if the moving object looks blurry. You can also try shooting in "Night" mode or "Night Portrait"  (You will want to turn OFF the flash)  You can also try "Fireworks," but this setting has a very long shutter speed and should be used in dark locations, with a tripod or on a supported, flat surface.  Try using the self-timer function if the photo is too blurry everywhere.  Remember, with a Point and Shoot camera, there is a lot of trial and error, so be patient and take a lot of photos!!

Short Shutter Speed (to freeze motion)

If you want to freeze motion, most Point and Shoot cameras have a way to do this.  Look for the Sports Icon as this mode will use the shortest shutter speed possible based on the lighting situation.  You will still probably need to be in a very bright location.  This mode works best outdoors.  It is NOT just for sports.  It can be used to freeze moving water or to better focus on a rather spastic subject (like babies, children and animals!)

ShortCourses-- Click on ALL red animation buttons on the left side of page!!


WHAT IS CAMERA SHAKE?

Camera shake occurs OFTEN. It is especially bad when you take photos in low light. Click this link to learn six ways to avoid this dreaded problem! (one thing she doesn't mention here is that you can also lay your camera on a table, post, tree, ground, etc.and use the TIMER function to stabilize the camera)

Wednesday, March 5, 2014

Exposure: Aperture/Depth of Field


What is Aperture?

Simply put, aperture is a hole within a lens, through which light travels into the camera body. It is easier to understand the concept if you just think about our eyes. Every camera that we know of today is designed like human eyes. The cornea in our eyes is like the front element of a lens – it gathers all external light, then bends it and passes it to the iris. Depending on the amount of light, the iris can either expand or shrink, controlling the size of the pupil, which is a hole that lets the light pass further into the eye. The pupil is essentially what we refer to as aperture in photography. The amount of light that enters the retina (which works just like the camera sensor), is limited to the size of the pupil – the larger the pupil, the more light enters the retina.


So, the easiest way to remember aperture, is by associating it with your pupil. Large pupil size equals large aperture, while small pupil size equals small aperture.  (source)


Brown Eye Close Up
image courtesy boogy man

Size of Aperture – Large vs Small Aperture

In photography, aperture is expressed in f-numbers (for example f/5.6). These f-numbers that are known as “f-stops” are a way of describing the size of the aperture, or how open or closed the aperture is. A smaller f-stop means a larger aperture, while a larger f-stop means a smaller aperture. Most people find this awkward, since we are used to having larger numbers represent larger values, but not in this case. For example, f/1.4 is larger than f/2.0 and much larger than f/8.0.


Take a look at this chart (image courtesy of Wikipedia):
F-numbers
The size of the circle represents the size of the lens aperture – the larger the f-number, the smaller the aperture.

What is Depth of Field?

One important thing to remember here, the size of the aperture has a direct impact on the depth of field, which is the area of the image that appears sharp. A large f-number such as f/32, (which means a smaller aperture) will bring all foreground and background objects in focus, while a small f-number such as f/1.4 will isolate the foreground from the background by making the foreground objects sharp and the background blurry. (source)


TO DO:


Click These links: 
1. PhotoAxe-Depth of Field  
2. PhotoAxe-Aperture  
3.  ShortCourses-Aperture-- Click on ALL red animation buttons on the left side of page!! 
4. http://ruleofthirdsphotography.com/interactive-aperture/
5. Exposure Controls
6.Choosing Exposure Modes (focus on Av, A-DEP, and Close-Up (Flower Icon))
7.  NGA PhotoSnapper <----fun font="">

Chapter 3: Black & White Photography


We are beginning Chapter 3 in our Focus on Photography textbook now.

During this unit, you will complete the following:

1. Identity Assignment
2. Aperture Worksheet
3. Shutter Speed Worksheet
4. "Macro" Photos
5. Motion Blur Photos
6. Optional:  Light Painting Photos (in class)
7. "Choose 3" Fun Photo Editing Assignments (These won't be due for awhile)
8. Quiz.  This will cover chapter 3, vocab terms, aperture, shutter speed, and ISO