Tuesday, February 28, 2012

Blur Examples


Blur It!

This lesson was adapted from http://w4.nkcsd.k12.mo.us/~manderso/educ/lessons/vizphoto/s2_005.htm

Your Goal: Use blurred motion with a clear purpose and with a clear result. In other words, try to get a shot in which the blur really expresses motion. (See the examples in the following post.)

Experiment with slow shutter speeds while photographing people in motion. If you're outside, you'll find this assignment easiest on a gray, overcast day, since you won't want much light. It may be best to take these photos at night or inside.

Be sure to turn OFF your flash.....

Remember that all cameras are different.  To get long shutter speeds, you may need to set your camera on "fireworks" or on "landscape mode"  Other slow shutter speed settings you might see on your camera could be called Night Scene, Indoor, or Sunset. Try out different ones if you have more than one setting.  DSLR owners should use Shutter Speed Priority Mode (Tv or S) and set the shutter speed to a larger fraction such as 1/2, 1/4, 1/8, 1/16, 1/30 (it will vary depending on the amount of light where you are).

You may want to try shooting in one of these ways:

1. Aim your camera so your subject is moving into the frame. Begin following your subject's motion and then release the shutter. Keep moving with the subject as the shutter opens and closes. This will produce a blurred background with your subject more or less "frozen."

2. Mount your camera on a tripod or find some other way to hold it very steady. (Use the timer to release the shutter) Aim so your subject is moving into the frame and release the shutter. This will produce a steady background with your subject moving across the frame as a blur. If you use a long enough exposure time, figures will appear ghostly or disappear entirely.

3. Aim your camera so that your subject is moving across the frame. As the subject moves into the frame, move your camera against the subject's path of motion, releasing the shutter as you pan across the subject. As a variation, try moving your camera toward the subject or in a rotation as you release the shutter.

Possible subjects include runners; almost any sports activity; moving vehicles (especially at night!); a group of people jumping or in motion (like during passing time); twirling, swinging, dancing. Your subject should contrast with the background (light on dark, dark on light, complimentary colors, etc.) Although your images will document a human activity, movement or action is the real subject matter. Your images may not reveal the character or personality of the people involved, but should suggest human vitality and creativity.

Make at least forty related images that are blurry. (YOUR PHOTOS NEED TO BE RELATED, LIKE IN A SERIES!)

You may only manipulate your images by cropping, contrast, or color - you may NOT use blur filters.

Examples will follow in another post.


Exposure: Shutter Speed

What is Shutter Speed?

Shutter speed, also known as “exposure time”, stands for the length of time a camera shutter is open to expose light into the camera sensor. If the shutter speed is fast, it can help to freeze action completely, as seen in the above photo of the dolphin. If the shutter speed is slow, it can create an effect called “motion blur”, where moving objects appear blurred along the direction of the motion. This effect is used quite a bit in advertisements of cars and motorbikes, where a sense of speed and motion is communicated to the viewer by intentionally blurring the moving wheels.

How shutter speed is measured

Shutter speeds are typically measured in fractions of a second, when they are under a second. For example 1/4 means a quarter of a second, while 1/250 means one two-hundred-and-fiftieth of a second or four milliseconds. Most modern DSLRs can handle shutter speeds of up to 1/4000th of a second, while some can handle much higher speeds of 1/8000th of a second and faster. The longest shutter speed on most DSLRs is typically 30 seconds (without using external remote triggers).

Fast, slow and long shutter speeds

Fast shutter speed is typically whatever it takes to freeze action. For me, it is typically above 1/500th of a second for general photography and above 1/1000th of a second for bird photography.
Slow shutter speed is considered to be the slowest shutter speed that you can handle without introducing camera shake. 
How about long shutter speed? Long shutter speeds are typically above 1 second, when you have to use a tripod to get acceptably sharp images (for low-light/night photography or to capture movement).

How to set shutter speed (if you have a DSLR camera)

Most cameras handle shutter speeds automatically through in-camera metering. When the camera is set to “Auto” mode, both shutter speed and aperture are automatically selected by the camera. 
There are two ways to manually set the shutter speed:
a) By setting the camera to “Shutter Priority” mode, where you set the shutter speed and the camera automatically selects the aperture.
b) By setting the camera to “Manual” mode, where you set both shutter speed and aperture manually.
c.)  By setting the camera to "Bulb" or B mode.   This mode allows the user to hold in the shutter-release button  in and the shutter will remain open the entire time while the button is being held. 


How to set shutter speed (if you have a regular point & shoot camera)

Most cameras handle shutter speeds automatically through in-camera metering. When the camera is set to “Auto” mode, both shutter speed and aperture are automatically selected by the camera. 
However, we can "trick" the camera into providing us with a short or a long shutter speed.  It will be trial & error, so be prepared to take a lot of photos and check them to see if the moving object looks blurry.

 Most digital cameras have at least one setting that will provide a long shutter speed.   First, try setting your camera to "Landscape" mode (Mountain Icon) .  This will make moving objects look blurry in medium to dim light locations.   You can also try shooting in "Night" mode or "Night Portrait"  (You will probably have to turn OFF the flash)  You can also try "Fireworks," but this setting has a very long shutter speed and should be used in dark locations.


Click all of these links and take notes on what is important.  You'll be given a quiz on this later!


ShortCourses-- Click on ALL red animation buttons on the left side of page!!

Friday, February 24, 2012

Next Photo-Taking Assignment: Macro Mode


Regular Digital Cameras:  We will be using the FLOWER ICON on your digital cameras. This is Macro Mode. It is used for taking photos of things up close. It uses a larger aperture and so creates a more narrow depth of field. It is good for taking photos of flowers, thus the icon.


DSLR owners should use the A or Av function (Aperture-priority mode, which allows users to set the f-stop and the camera automatically adjusts the shutter speed based on the amount of light)


~~~~You will need to avoid CAMERA SHAKE.~~~~


Camera shake occurs OFTEN. It is especially bad when you take photos in low light. Click this link to learn how to avoid this dreaded problem! (one thing she doesn't mention here is that you can also lay your camera on a table, post, tree, ground, etc.and use the TIMER function to stabilize the camera)

You are strongly urged to take these photos outdoors in natural light. (DURING THE DAY!) This will give you the best lighting. If you are shooting indoors, please turn every light on and don't shoot at night.


You can click on this link to read more about
Macro Mode.

~~~


Your Assignment:
Explore the use of the Macro Mode to create narrow depth of field in your artwork.


Remember that Macro Mode will allow you to focus on things that are close, but things that are far away will be blurry. Blurry is good in this case, as long as EVERYTHING is not blurry.


Be creative and think about what you can photograph. Don't photography flowers. (There aren't many flowers this time of year anyway) Groups of similar objects work well. Remember to always think about the elements of art and the principles of design. 


DO NOT FORGET TO THINK ABOUT YOUR COMPOSITION RULES!!! Especially the Rule of Thirds, leading lines, and dramatic angles.   PS: Don't Center Stuff!


In your photos, things up close should be in focus and things further away will be slightly (to majorly) blurry.


You must take at least 50 photos.  Your 50 photos will be worth 50 points.


    Aperture Review


    Remember:

         Aperture refers to the size of the HOLE.

         A large aperture makes items close in focus...and things far away blurry.

    This was taken at f-3.2


         F-Stop refers to the f-number 
     
    This was taken at f-9
         A large F-Stop number will make things far away very clear and in focus
    .


          So, you have to check the question to see if it is asking about the f-stop number or the APERTURE.


       Today,

           1.  Fix the questions that you got wrong on the Aperture Worksheet from yesterday.

           2.  Go to http://www.nga.gov/kids/zone/photoop.htm   Try making a moving object blurry, while the background is in focus.  Try changing the aperture and shutter speed to make the photos look clear in the background, or blurry in the background.

           3.  Visit these links:
                Using Aperture and Shutter Speed Together   <---  Be sure to link on the red ANIMATION button(s)
                Understanding Exposure
         
            4.  Don't forget that MACRO MODE (50+) photos are due on Monday.  No Photos = Bookwork.


    Tuesday, February 21, 2012

    Tuesday February 21st

    Today...

    1.  Finish up your Identity Assignment.  This will be the last day that we devote to this assignment.

    2. Finish any unfinished work.(Check the Assignment Checklist below!)  Post to blog and let me know when you do.

    3.  Just a reminder that you are NOT to be streaming videos or music from the Internet.  NO GAMES.  If you are finished with everything, then I suggest you find a photo to manipulate and then work with it on Paint.NET.   For this, since it is not an assignment, you may use Google Images.  However, do NOT post it to your blog unless you are the only creator of the image or you found the image on www.sxc.hu   This is for copyright reasons.

    Friday, February 17, 2012

    Assignment Checklist

    These are the assignments that should be posted to your blog.  Be sure you have them all! We move quickly and you don't want to get behind!

    1.  Value Assignment (3-5 photos from your white paper sculptures)
    2.  Series (A series that you edited from your value assignment)
    3.  Color Wheel
    4.  Composition Photos (5-10 photos selected from Comp Photos)
    5.  Photo Chain #1  (edited photo of the original I sent to you)
    6.  Photo Chain #2  (an edited photo that was selected by another classmate)
    7.  Identity Photo Assignment (in progress)


    Other Assignments not on Blog: 
    1. History of Photography PowerPoint (group work)
    2. Elements and Principles of Art PowerPoint (individual work)
    3. Paint.NET PowerPoint (individual work) 

    Wednesday, February 15, 2012

    Photo Chain

    You will first look at the photo manipulations of Tom and Harold by clicking the following link.

    http://www.tomrchambers.com/tom_harold/www.tomharold.com/next.html


    Then, check your access email for an email from ecrouch@access.k12.wv.us (a.k.a. me)


    Download the photo that I sent you and edit it in the style of Tom/Harold.  You may add photos to it as long as you use www.sxc.hu

    Upload your edited photo and the original to your blog.  Call it Photo Chain #1.

    Then, email a classmate with a photo selected by you from your own photos or www.sxc.hu

    They will then have to edit it, post it to their blog with the original and call is Photo Chain #2.

    Tuesday, February 14, 2012

    Collecting & Gathering for Identity Assignment

    You can begin COLLECTING and GATHERING for your next assignment.

    The theme of the next assignment is IDENTITY.

    I want you to think of things that represent YOUR identity.

    Are you a basketball player, a church-goer, an art lover,....search http://www.sxc.hu/ for images that relate to your identity and save them.  You need to find at least 10 images.  I would suggest that images relate.  For example, if you are a swimmer, you will probably want to find images that ALL relate to swimming.

    COLLECT and GATHER SELF-PORTRAIT:  Take at least 30 self-portraits.  Use the timer function on your camera.  Remember to think about lighting (just like in your paper sculpture pics) You will want to set up a light and aim it at one side of your face.  However, avoid extreme contrast in light and dark as it leads to an overexposed white.  BE CREATIVE.

    Self-Portrait photos are due tomorrow!

    Monday, February 13, 2012

    Composition Photos Due Today

    • You need to select your strongest 1 or 2 images from each area of Composition Rules.   This means you need 1 or 2 photos that use the Rule of Thirds, 1 or 2 that use the Diagonal Rule, 1 or 2 that use Frames, 1 or 2 that use Dramatic Angles, and 1 or 2 that use Leading Lines.

    • You may edit them using Paint.NET. (You may also choose not to edit them.  Every photo doesn't need to be edited!)   Do not use the the Artistic Menu or Distortions.  Final images could be black and white, sepia or in color.  You may adjust anything under the Adjustments Menu, but do so with discretion.  If it is a strong image without edits...you don't want to over-do it!

    • Post these to your blog.  You need a total of 5 to 10 images. 

    • Then, click the links of the other students blogs in this class. 

    • Comment on at least 3 people's blog, giving them feedback and/or constructive criticism about their photos.

    Wednesday, February 8, 2012

    Color Wheel

    Using ONLY Your Own Photos or Photos from http://www.sxc.hu/, create a creative color wheel.  Be as creative as possible (it doesn't have to be a circle!)

    Begin with a New File on Paint.NET and make the canvas 10" by 10".  Change the Resolution (dpi) from 96 to 150.

    Make sure you use all 12 colors and they are in the correct order.

    • red
    • red-orange
    • orange
    • yellow-orange
    • yellow
    • yellow-green
    • green
    • blue-green
    • blue
    • blue-violet
    • violet
    • red-violet
    examples:


    You can use multiple images in different colors.


                                                       You can use one image and change the hue.
      
    (note that this one does NOT contain all 12 colors)

    Tuesday, February 7, 2012

    Compostion Assignment (Photos due Monday!)

    Be sure to READ ALL of the following info and click on the links at the bottom:


    Photo Composition Rules

    What is a photograph? It is a story. What is a story? It is is a series of sentences connected to each other. The same is true about photography. To create a photograph, it is not enough just to take an image of something. The first impression from a photograph is determined by the composition balance of an image.


    To increase the expressiveness of your digital pictures, apply the picture composition rules while taking the photos or modeling their edges.
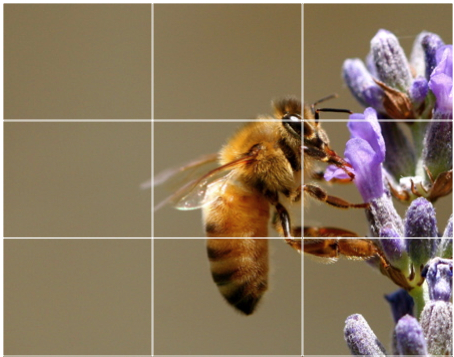
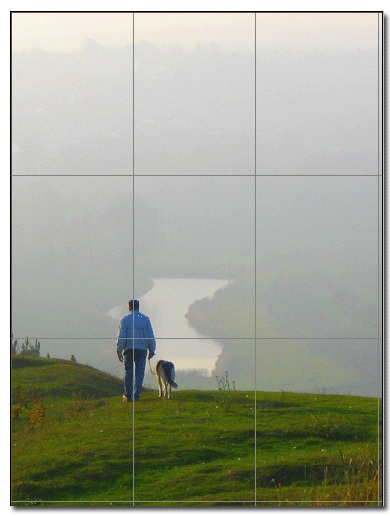
    Rule of Thirds
    The Rule of Thirds is based on the fact that the human eye is naturally drawn to a point about two-thirds up a page. Crop your photo so that the main subjects are located around one of the intersection points rather than in the center of the image:
    Your landscapes will be optimally pleasing to the eye if you apply the Rule of Thirds when you place your horizon line. If the area of interest is land or water, the horizon line will usually be two-thirds up from the bottom. Alternately, if the sky is the area of emphasis, the horizon line may be one-third up from the bottom, leaving the sky to take up the top two-thirds of the picture:


    Diagonal Rule
    One side of the picture is divided into two, and then each half is divided into three parts. The adjacent side is divided so that the lines connecting the resulting points form a diagonal frame. According to the Diagonal Rule, important elements of the picture should be placed along these diagonals:


    Linear elements, such as roads, waterways, and fences placed diagonally, are generally perceived as more dynamic than horizontally placed ones:


    Your Assignment:
    Click on the following link:
    Composition Information
    Click on the various images to view all the information about Composition Rules and Photography

    Your Photos:
    You will need to take at least 10 photos for each of  the following:  (This is a total of at least 50 images!)
    • Rule of thirds,
    • Diagonal rule,
    • Leading lines,
    • Dramatic angles and 
    • Frames
    Be sure to fill the frame, avoid amputation, watch the background (keep it simple!), watch for aliens, and simplify, simplify, SIMPLIFY!


    Click on these links to learn more about Photo Composition.  It is important that you click and read these!

    Amateur Snapper
    Photoinf
    Photoinf-Geoff Lawrence
    Elements of Design &lt

    PHOTOS ARE DUE ON MONDAY!

    Wednesday, February 1, 2012

    Paint.NET PowerPoint

    You will probably hate this assignment, but afterwards, you will know how to use Paint.NET


    Using Microsoft PowerPoint you will show examples of the following:

    For each item, you need to include:
    1. Type the Title (ex. Gaussian Blur),
    2. Explain what it does and how it works (The less words you use the better, but explain it in a way that you understand. YOU MUST USE YOUR OWN WORDS!)
    3. Post an original unedited photo
    4. and then one where you have adjusted the image using the tool/effect/adjustment. (For Layers, then you will need to use 2 photos and have them in 2 different layers)
    Example of one slide: (mine is copied from the website, yours MUST be original and use your own photos! If you don't have any photos of your own yet, then select one from www.sxc.hu)