
Understanding Histograms,
How to Use a Camera's Histogram (Part1)

Then watch these YouTube videos on Adjusting LEVELS
Darkening an image using levels and histogram
How to Edit the Histogram
Your Assignment
- Right click on this photo.
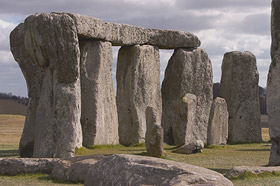
- Copy the photo.
- Paste it into a new image using Paint.NET
- In Paint.NET... go to Adjustments > Black and White to make the image black and white
- Then, go to Adjustments > Levels to open the Levels dialog. The Levels dialog can appear a little intimidating at first sight. You'll note that at this point, the two histograms run vertical on the screen and they are mirror images. It should look like this

- You will adjust the Input slider to change the Output Histogram and, as we do so, we will see the changes affect the image in real time.
- You will want to stretch the Output Histogram so that there is almost no space above or below it. To do this, we slide the top Input slider downwards till it is almost level with the top of the Input Histogram. You'll see that this causes the Output Histogram to stretch upwards. You also need to slide the bottom slider upwards to stretch the Output Histogram downwards. After you adjust the INPUT slider, your histogram should look like this:

Your final image should look more like this:

8. Next, go to www.crouchphotoart.weebly.com and turn in the adjusted final image. The assignment name is HISTOGRAMS.
No comments:
Post a Comment